Showing posts with label DIY. Show all posts

Thursday, June 28, 2012

DIY Menswear Mice cat toys

Martha Stewart always has great DIY projects, and these cute Menswear Mice cat toys are no exception! What a great way to recycle that old wool suit jacket, or those outdated dress pants. Corduroy pants and felted wool sweaters would work just as well!

You will need the following supplies:

  • Assorted menswear fabrics (remember, these can come from a woman's closet too!), such as wool suiting, cotton dress shirts, corduroy, and cotton velvet
  • An iron
  • Fusible webbing
  • Sewing machine and supplies
  • Loop turner
  • Poly-fill stuffing
  • Embriodery floss & needle
  • Printed mouse template

Just follow the step by step instructions found here, and make these great mice for your sweet kitty! And since they take such little fabric, why not make a few extra to donate to your local shelter or rescue?


Friday, April 13, 2012

Homemade chicken jerky dog treat recipe

With all the horror stories of dogs becoming sick, or even dying, from eating contaminated jerky treats, more and more people are searching for ways to make their own. It is actually really easy to do, and costs a fraction of what the treats in the store do.

What you will need:

An oven
Chicken breast with excess fat trimmed off *
Sharp, non-serrated knife

* To make the chicken easier to slice, you can bake it first, as if making it for yourself for dinner. Or you can use slightly frozen chicken, but remember cooking times will be longer.

Directions:

1. Preheat the oven to 200 degrees.
2 . Slice chicken breast into thin strips, about 1/4 inch thick (or smaller, if you can). Slice with the grain, not against it. This will make the strips chewier, thus lasting a bit longer.
3. Arrange the chicken strips on a greased cookie sheet. Remember to use one with a raised edge, or line the bottom of your oven with foil to collect the juices.
4. Bake for 2-2 1/2 hours, or until strips are dry. They should not be so dry that they break when bent, but they should be dry and chewy.
5. Extra pieces can be placed in a zip-lock bag or airtight container and stored in the fridge. They can also be frozen for up to 3 months.

For extra money savings, keep your eyes out for packages of marked down chicken breasts in the supermarket. These packages are often nearing their sell-by date, but if frozen or cooked right away are perfectly fine. This recipe is also a great way to use up chicken breasts that may have gotten a tad freezer burned.

Monday, March 26, 2012

D.I.Y. cardboard cat scratcher

If your kitties are anything like my two, they love to scratch. Cats do not scratch as a way to be bad (though sometimes I think mine do!), it is how they keep their claws groomed and sharpened. There are a million different scratching posts and pads that you can buy, but why not try this great D.I.Y. version from Maggie May's blog? I promise you that your kitty will love it just as much as the one from the pet store, and your wallet will be much happier. And as a bonus you will be repurposing cardboard boxes and keeping them from a landfill! Talk about a win win!

You will need:

  • an assortment of corrugated cardboard boxes, any size
  • hot glue gun 
  • scissors
  • cute paper or fabric for the edges


Instructions:

  1. Cut the cardboard into strips at least 2-inches wide (wider if you would like), and at least 12-inches long. 
  2. Line the pieces up side by side, with the edges of the cardboard facing up, until you get a stack at least as wide as your palm.
  3. Use your hot glue gun to glue the pieces together.
  4. Measure and cut a 2-inch wide (or wider, if your strips were wider) strip of paper or fabric long enough to wrap around the outside of the entire pad, creating a pretty frame.
  5. Leave each side of the scratching pad uncovered - this way you can flip it over when your cat has worn down one side. 
  6. Sprinkle some dry catnip onto the new scratching pad and introduce it to your sweet kitty!


                  (photo from Maggie May)

Sunday, December 11, 2011

Homemade treats for your sweet kitty!

I know I know, I missed a few days with posting lovely holiday stuff. I could give you a list of excuses (finals, messy house, cat attacks, etc), but why bore you with that? Instead I will try and make it up by sharing these incredible kitty treat recipes I found on PetPlace.com!


Savory Cheese Treats (makes 2 dozen treats)
  • 3/4 cup white flour
  • 3/4 cup shredded cheddar cheese
  • 5 tablespoons grated parmesan cheese
  • 1/4 cup plain yogurt or sour cream
  • 1/4 cup cornmeal


Preheat the oven to 350. Combine cheeses and yogurt. Add flour and cornmeal. If needed, add a small amount of water to create a nice dough. Knead dough into a ball and roll to 1/4 inch. Cut into one inch sized pieces and place on greased cookie sheet. Bake for 25 minutes. 


Tuna Tidbits
(makes 12)

  • 6oz. can of tuna
  • 1/4 cup liquid drained from tuna (add water to liquid if needed)
  • 3 tbsp cooked egg whites, scrambled 
  • 1/4 cup cornmeal
  • 1/2 cup whole wheat flour


Preheat oven to 350 degrees. Combine tuna, egg white and water. Add cornmeal and flour and blend to form a dough. Knead into a ball and roll to 1/4 inch thick. Cut into one-inch sized pieces. Bake at 350 for 20 minutes. 


Thanks to PetPlace.com for sharing these terrific recipes!


Thursday, December 8, 2011

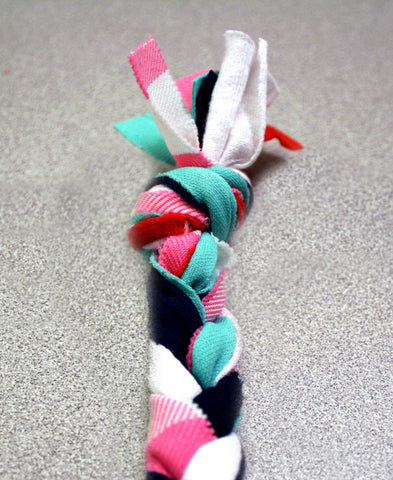
Turn your old t-shirts into a tug toy for your pooch!

When it comes to saving money, finding new uses for items you already have is one of the best things to do. Upcycling is the act of taking an old item and turning it into something new. Not only does it save you money, but it also keeps items from ending up in the landfill - a win win!

If you are anything like me you have a bunch of old t-shirts laying around. I have two drawers full of them, mostly free ones from events I have attended, and to be honest I don't wear them often enough to keep them. In my search for upcycling projects for my collection I came across these great instructions for turning those old shirts into a tug toy for your dog!


It is an insanely simply project that can be completed in less than an hour. You can even make a few of them in an afternoon so your pup always has a spare! What a fun and simple gift to make for Fido's stocking!

From DIYyourfaceoff.com, by iamthemandy


What You Will Need:

scissors
old t-shirts (use a few for a colorful toy, or one for a solid color)


Step 1: Take your t-shirt and begin cutting 12 1inch strips, about 17inches long. If your dog is a larger size, make your strips longer.

Step 2: Gather all 12 strips together and tie a knot at one end.


Step 3: Divide the strips into 3 groups of 4 strips, and begin to braid down the length of the strips. 


Step 4: Gather all strips at end and tie a knot. 


Step 5: Enjoy playing with your dog and their new toy!


Thanks to DIYyourfaceoff and iamthemandy for sharing this great project! All photos from DIYyourfaceoff

Monday, December 5, 2011

Crochet your own catnip toys!

When I was younger my grandmother taught me to crochet, and even today I still enjoy it. In my search for D.I.Y. (Do It Yourself) cat toy tutorials I came across this adorable crochet pattern on Mollie's Blog of Stuff for an "Easy Peasy Catnip Mouse."To be honest I never learned to read patterns (I wish I had), but judging by the comments it is a fairly simple one. I may have to have one of my crocheting friends teach me to read patterns so I can make these cute toys for my kitties! The best part is that they take very little yarn, so they are a great craft for using up all those leftover pieces from other projects! Wouldn't your kitty love to get one of these in their stockings?


Easy Peasy Catnip Mouse


Materials Needed:

Small amount of scrap acrylic yarn, small amount of good quality catnip, 3.5mm crochet hook, some stuffing, jingle bell (optional).

Pattern:

Ch 17,
Row 1: sc in 2nd st from hook and continue till the end. This will make the tail.
Row 2: Next, make 7 sc in the last loop of the tail (ie. In last sc). (7st total)
Row 3: We will be working in a spiral so do not sl st into the first of the 7 sc. Next, do 2sc in each sc (14st total)
Row 4: *sc in 1st sc, 2sc in 2nd sc* repeat 6 times. (21st total)
Row 5-7: sc in each sc
Row 8: sc in first 5 sc, sc next two sts tog. Repeat until you can just snugly fit your index finger into the top of the mouse. Stuff with catnip and stuffing (and bell).

*next we add the ears. Get another colour of yarn, join it to the outer lip of one sc, as we will use the inner lip to complete the mouse. Ch 2, then in the same sc make 2 dc, sl st in same sc lip. Next, sl st in the outer lip of the next stitch, and the one after. Next, ch 2, 2dc and sl st. tie and cut off.

Row 9: Continue with sc in 1st sc, sc next 2 sts tog, until you only have 7 sts around left. After which just sc next 2 sts tog until you are left with about 3 sts. Leave a 3 inch tail of yarn to seal and secure.

Weave in any loose ends into the mouse, et voilá!!! You have a catnip mouse!


Thank you Mollie for posting such a great pattern!

Thursday, October 27, 2011

Homemade Halloween treats for your pets

This blog is all about saving money on your pet needs, and one way to do that is by making your own homemade treats for your pets. Treats are great for many things, including training your pet, but purchasing them can get expensive. The ASPCA had some terrific Halloween Treat recipes on their site that I would like to share with you. I am going to make the Peanut Butter and Pumpkin Pooch Treats this weekend to share with my mother's five (yes, five!) dogs this weekend, since I already have all the ingredients on hand.

Sourced from: ASPCA Blog

Peanut Butter and Pumpkin Pooch Treats
Your dog will love the taste and enjoy the crunch!


2 1/2 cups whole wheat flour
1/2 cup fresh or canned pumpkin (not seasoned pie filling)
1/2 cup peanut butter
2 teaspoons cinnamon
1 teaspoon baking powder
1/2 cup water as needed
Preheat oven to 350 degrees Fahrenheit.
Whisk together flour, baking powder, pumpkin, peanut butter and cinnamon in a bowl.
Add water as needed, but the dough should be stiff and dry.
Roll to 1/2 inch thick and cut with holiday cookie cutters.
Bake for about 40 minutes, or until hard.

Halloween Cat Cookie
Your kitties will love the fishy flavor of these tasty treats.


1/4 cup warm water
5 Tablespoons parmesan cheese
3 Tablespoons soft margarine
1 Tablespoon cod liver oil
1 cup white flour
1/4 cup soy flour
Preheat oven to 300 degrees Fahrenheit.
Combine water, cheese, margarine and oil.
Add flour and form dough.
Roll to 1/4 inch thick and cut with small holiday cookie cutters.
Bake on an ungreased cookie sheet for 20 to 25 minutes, or until golden.

A big thank you to the ASPCA for providing pet owners with these easy to make treat recipes!